Home » Posts tagged 'cabinet refacing'
Tag Archives: cabinet refacing
Tips for a Successful Bathroom Remodel
Bathroom Remodel is a project where something will probably go wrong. Whether that’s a scratch in the wall, a broken drawer or a missing piece of tile.
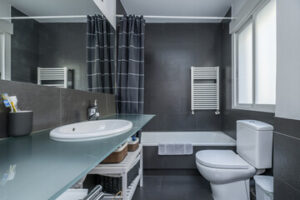
A well-designed bathroom should be comfortable, functional, and inviting. To achieve this, careful planning is key. This involves the layout of fixtures and storage, establishing what features are essential for your needs. In addition, zoning is critical for separating wet and dry areas, enhancing efficiency and safety. Visit Website to learn more.
The layout of your bathroom remodel begins with assessing your space. This includes identifying where the existing plumbing and electrical wiring is located. This will affect how much of a renovation is possible. Once this information is available, you can start the design process. To get the most out of your project, it’s important to develop a plan for your new bathroom layout before starting any construction work. This will ensure that all of your ideas are practical and help you visualize how the finished space will look.
There are a variety of layout options to fit any style and budget. For example, if you’re re-modeling a small bathroom, the most efficient way to layout the room is to use an L-shaped vanity with plenty of counter space. This allows you to maximize the space and keep all necessities within reach. Alternatively, a three-quarter bathroom layout is ideal for guest bathrooms or homes that don’t need a tub. It combines the toilet, sink, and shower to create an efficient layout that’s also easy to clean.
Using partition walls and a pocket door to create a private space for the toilet is an excellent way to improve the functionality of a long bathroom. It eliminates the need for a conventional door and reclaims space that would otherwise be wasted by the swing of a standard door. It’s also a great way to accommodate two sinks and ensure that each person can access their own vanity without getting in each other’s way.
Another way to maximize your space is to place the vanity in one corner of the room and the toilet in another. This allows you to use the corner space for additional storage and frees up floor space for movement. It’s also a great way for small bathrooms to have plenty of counter space and still feel spacious.
Lighting
One of the most important parts of a bathroom remodel is the lighting. You want to incorporate layers of ambient, task, and accent lighting to create a well-lit space that is functional and inviting. Consult a lighting specialist and an electrician to get the best results.
Consider replacing your existing light fixtures with something more contemporary. Today’s bathroom lighting is available in a variety of styles that can fit into any decor. In addition, LED options are energy efficient and provide a warm glow that will not become dim over time like many older lights do.
If you are changing your fixture locations, be sure to update the electrical wiring and patch any holes that may need to be closed. This is a good opportunity to take advantage of a professional electrician who can also make sure that your bathroom’s lighting is properly grounded.
Installing new cabinet hardware, a fan, mirrors and other accessories will add the finishing touches to your bathroom. Look for a style that complements the other features of your bathroom and fits your overall design aesthetic. You may want to purchase a kit that bundles all the essential accessories together, which can be a cost-effective way to keep your budget under control.
Tile is another finishing touch that can make a big difference. There are endless choices in color, shape, texture and pattern, so it is important to take the time to carefully select your tile design. Consider using a bolder tile in a small area of the room, such as a backsplash behind the sink or in a shower niche, to add visual interest. In larger areas, it is a good idea to use more neutral tiles and limit the use of colors in order to keep the room looking spacious.
Another small change that can have a big impact is the addition of wall art or handcrafted items. Choose framed artwork that suits your taste and complements the overall look of the bathroom, or frame some family photos for a personal touch. Another great option is to bring some natural elements into the room with a plant or other greenery. You can even find wallpaper that is designed to resemble the appearance of grass, leaves or trees.
Storage
Whether your bathroom is small or large, it likely needs some additional storage. Here are savvy ways to add space without sacrificing style, including hiding eyesores behind stylish solutions and maximizing under-sink room.
Towels can easily become a tangled mess, but hang a simple rod from the ceiling to keep them organized and out of sight. This storage idea, like this one from Lexi Grace Design, works well in a small bathroom to keep all of the towels you need for shower and bath tucked away neatly.
Use a shelf that mimics the look of a painted hutch to provide plenty of storage space for everyday items. Open cubbies are perfectly sized for rolled or folded towels, while a narrow shelf can hold a few bottles of body wash and bubble bath, as this bathroom did. A decorative basket can hold cotton swabs and nail clippers to keep them within reach.
If you don’t have the budget for built-in shelves, a simple stool can help add storage to a powder room or main bath. Choose a piece with a fun color, shape or pattern to make it more appealing. Here, a pleated fabric skirt brings texture and dimension to the space while also hiding unsightly plastic storage containers.
A wall-mounted magnetic knife rack is a simple but effective way to tame countertop clutter. Stick nail clippers, tweezers and other metal implements to the bar to keep them off your countertop and avoid rust stains.
Drawers can get messy fast, so add dividers to each drawer to keep the contents organized and easy to access. These handy dividers work well for storing hair tools and supplies, makeup and toiletries, and even cleaning products. This trick from Dream Green DIY is a great way to maximize cabinet space in a small bathroom.
If multiple people share a bathroom, keep each person’s essentials corralled in their own drawer with labeled dividers. This will minimize the transfer of germs and make it easier for everyone to find what they need.
Design
When it comes to design, there are a variety of ways to change the look and feel of your bathroom. You can go with a full renovation, which involves moving around the major elements, or you can opt for a partial remodel and simply switch out fixtures or add storage solutions.
A partial remodel is less intensive than a complete gut renovation, but it will still require demo and possibly some plumbing and electrical work. Adding a new vanity and cabinets will help to revamp the style of your bathroom, while adding a shower door or a window will bring in natural light to make the space feel bigger.
For a more subtle update, try adding some wall art or handcrafted items to your bathroom to refresh the look and feel of the space without breaking the bank. Framed photos and art pieces are a great option for a neutral space, or you could choose to create a bold design statement with patterned tiles.
When it comes to decorating, the details make a big difference. Match or coordinate the faucets, mirrors, and storage solutions with your color scheme and design style to pull your bathroom together. Choose finishes, colors, and textures that you love and can live with for the long term. Then add some finishing touches, like hand towels and a bath rug that complement your space.
Cabinet Refinishing – A Quick and Inexpensive Way to Revamp Your Kitchen
Cabinet Refinishing Sacramento is a quick and inexpensive way to revitalize your kitchen. It’s also a good choice if your cabinets are physically in good condition but need to be changed for aesthetic reasons.

However, this process is much more time consuming than refacing. It’s also dangerous because it involves the use of solvent-borne lacquer that emits volatile fumes.
Cabinet refinishing typically costs less than a complete replacement, but the cost varies widely depending on the level of transformation you desire. Refacing cabinets involves removing doors, hinges, and handles and sanding down the cabinet structure before installing new ones. It is a more extensive project than refinishing, and it can take longer to finish.
Adding custom finishes like glazing or distressing will increase your costs, as these techniques involve additional steps and add depth and dimension to the cabinets. Distressing can involve techniques such as sanding, denting, and applying crackle paint. This can give the appearance of worn and weathered wood, and it adds a rustic or vintage feel to your kitchen. Glazing, which is a transparent or semi-transparent color applied over a solid base color, can make the grain of the wood stand out and adds another layer of interest to your kitchen.
The cost of materials is also a factor in the cabinet refinishing process. Most pros include stain and top coat in their initial quotes, but your choice of finish can affect the final price. For example, changing the color of your cabinets will require more stain and more coats than keeping them the same shade. Choosing a lacquer finish will also require you to plan your time well, as solvent-based lacquers produce volatile fumes that can hang in the air for a day or two.
Lastly, you will need to budget for any necessary repairs. Refinishing can cause damage to the face frames and cabinet boxes, which will need to be fixed before the new finishes are installed. Additionally, if your cabinets have hardware that is different in size from the old one, it will need to be replaced.
Time
Cabinet refinishing is a time-consuming project. The amount of time required varies depending on the existing finish and how much you want to change your cabinets. For example, stripping and sanding can take up to a day for a typical oak door, but it can take more than that if you’re staining over a darker color or need to clear the surface for new finish application. You may also need to add more time for sanding if your cabinets have ornate trim and windows. Ensure that all surfaces to be worked on are protected and label all panels. This will help you quickly and easily return them to their correct spots during the reassembly process. It’s also essential that the paint fully dries before reattaching doors and hardware. This can add a few days to the project timeline.
The refacing process is more extensive than refinishing and requires additional time for planning, sourcing materials, and shop work. Adding additional elements like countertops, backsplashes, flooring, plumbing, and electrical work can also extend the timeline of a project.
A major benefit of refacing is that it’s a great solution for older cabinets with minor damage or wear. However, you should keep in mind that refacing doesn’t address problems such as loose veneer or chipped paint and will require more frequent maintenance than refinishing.
While refacing is the best option for transforming your entire kitchen, it’s important to consider the cost and timeline of the project before making a decision. Both refacing and refinishing are expensive projects, but they can be much cheaper than purchasing and installing new cabinets. A professional can help you determine which option is the most cost-effective for your home.
Effort
Unlike cabinet refacing, which involves replacing parts of the cabinets, cabinet refinishing only addresses aesthetic issues. It’s also less expensive than cabinet replacement, and you can use existing materials to transform your kitchen’s look. However, refinishing is a more labor-intensive project than refacing, and it requires careful planning and preparation. Choosing the right materials is essential for achieving a high-quality finish and ensuring durability.
Before beginning the refinishing process, you should clear off countertops and other surfaces to prevent accidental splatters and drips. Using a degreaser or trisodium phosphate (TSP) solution to clean the surface will help remove oils and dirt that could prevent a smooth, even finish. Lastly, you should cover any areas that you don’t want to paint with brown builder’s paper or plastic tarps.
It’s important to prepare the surface before painting, and this includes sanding the cabinet interiors and exteriors. Applying a primer is also necessary to ensure the new stain or paint adheres properly and resists moisture. Using the proper brushes or sprayers will also help you achieve a professional-looking result. Additionally, you should choose a paint or stain that is compatible with the existing material. Performing a test application on an inconspicuous area of the cabinet can help you determine how well the material adheres to the existing surface and whether it will meet your expectations.
Refinishing can be challenging, and mistakes can be costly. Hiring a professional will minimize the risk of mistakes and ensure a smooth, efficient workflow. Reputable professionals will also carry liability insurance, which protects you in the event of any accidents or damages that may occur during the refinishing process. Additionally, they will have the knowledge and experience to select a durable finish that will withstand years of wear and tear.
Materials
Paint and stain are the primary materials for cabinet refinishing, but you will also need primer, stripper, and sandpaper. High-quality, durable products are the key to a long-lasting finish. You can find cabinet painting supplies at home improvement stores and online. However, specialty paint stores often have a more extensive selection and carry specialized tools like fine-grit sandpaper and finishing sprays. They may also have a professional line of products that has been tested and used by professional painters.
Clean cabinets before refinishing to ensure the new coating adheres properly. Use a mild detergent and scrub the surfaces using synthetic steel wool or soap and water to remove grease residue. Trisodium phosphate (TSP) is highly effective on stubborn grease. Once the surfaces are completely dry, lightly sand the surface to prepare it for painting. Vacuum the sanding dust to ensure you don’t miss any spots and then wipe the cabinets down again to remove any residue from the sanding.
The cabinet refinishing process includes applying several coats of paint or stain until you achieve your desired result. During this time, it’s essential to follow the product instructions closely. For example, the Sherwin-Williams contractor website recommends waiting 24 hours between coats to avoid dents and peeling.
Once the cabinet refinishing is complete, apply a sealant to protect the new coating from moisture and stains. This protects the cabinets from wear and tear and extends their life, which is especially important for heavily used kitchen areas.
Cabinet refinishing is a cost-effective way to update your kitchen without a full-scale renovation. It’s also a good choice for homeowners who want to keep their existing door style and cabinet structure but change the color of the wood.
Professional Help
Cabinet refinishing is a great way to breathe new life into your kitchen. However, it’s important to hire professionals who have experience working with cabinet refinishing materials and techniques. This will help ensure that the job is completed properly and efficiently, without any damage or mess. A professional will also be able to provide helpful tips and tricks, so you can get the best results from your project.
Before you start your Cabinet Refinishing project, be sure to set up a workspace and remove all doors and drawers. Then, clean the cabinets with a degreasing solution to remove any dirt or grease that may prevent the paint from sticking. You should also wear protective gear, such as gloves and a mask, to avoid breathing in the dust or paint. Also, be sure to label the door and drawer fronts so you know which ones go where.
The process of refinishing involves removing the existing coats of stain or paint and then applying a fresh layer. This is usually done by hand sanding or chemically stripping the old finish. It’s a time-consuming process, but it can help save you money on a full kitchen remodel.
Another benefit of refinishing is that it can last longer than painting. If you use a quality stain and apply multiple layers, the finish will last up to three times longer than a painted surface. In addition, a good stain will protect the wood from stains and water damage.
One drawback of refinishing is that it limits your options for color and style. If you want to change your cabinet door style or wood species, you’ll need to reface them.